Within a few weeks, nighttime temperatures will be cold enough to freeze water. Any water that’s still in your garden hoses, handles and wands, and the outside faucet itself are at risk of damage, leading to anything from the need to replace hoses to major leaks in your home. It will soon be time to drain, or “purge” all your hoses and watering accessories, and store them for the winter.
First, remove any attachments from your hose, and drain any trapped water out by opening the attachment.
Next, unhook the hose from the outside faucet. If there are multiple hoses connected together, separate them from one another, which makes draining them easier. There are three basic ways to purge the hoses of water:
- If you have a strong set of lungs (and no heart condition!) then you can simply force the water out by blowing on one end of the hose. Having shorter hoses will definitely save you from popping a vein!
- Hold one end of the hose over your head and feed it hand over hand until you reach the other end. Gravity will do the rest. Do this at least twice – you’ll be surprised at how much water comes out the second time around.
- Use an air pump to force the water out. We use an inexpensive little plug-in air pump that’s made specifically to blow up air mattresses – they seem to have enough power to undertake this chore.
Wind the hoses and place them in yard waste bags. If you have more than one hose system (front yard and back yard, for instance), label the bags accordingly. If any of your hose runs use more than one length linked together, store them with one another. I also like to store the accessories with the hose they were attached to. Store in an area protected from snow, rain, and direct sunlight (garage; under the porch). Now that there is no water in the lines, cold temperatures shouldn’t harm them.
You’ll also need to remove the water from the outside tap (a.k.a. faucet, or bib) that comes from the house. To do this, go into your basement and find the copper water pipe that feeds through the wall to the exterior tap, and trace it back until you find the shut off valve. In older homes, this is most often found in the basement ceiling. Other places to look are in utility rooms, under kitchen sinks, and laundry rooms. In newer or renovated homes, the pipe may be hidden. If that’s the case, you should be able to find the shut off valve in the laundry, utility, or bathroom, under the kitchen sink, or sometimes in a small finished door in a basement wall (see photo below).
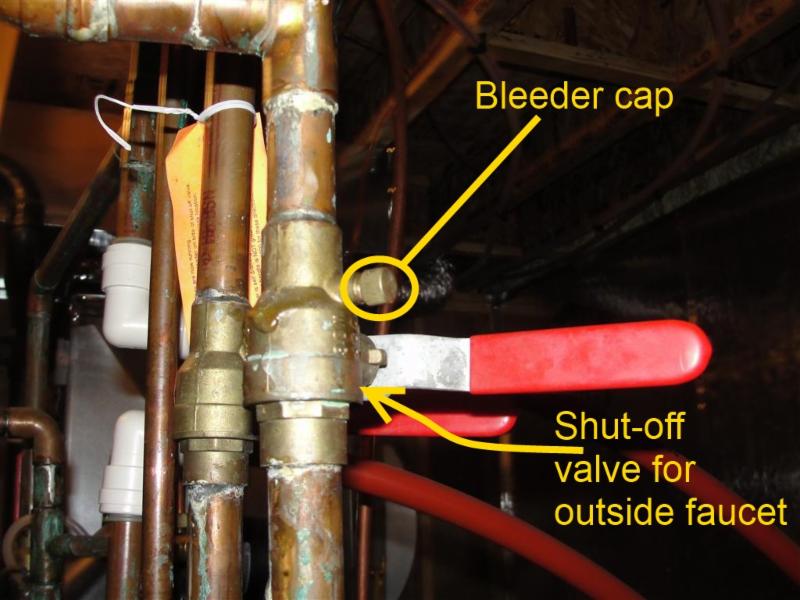
Once located, close the shut off valve. Water is no longer flowing to the outside faucet.
Then head back outside and fully open the outside tap. There should be no water pressure, and some trapped water will dribble out. Now go back inside to the shut off valve, where you should see a small, round, metal screw-on cap. This is the bleeder cap. Place a bucket under the bleeder cap, and then unscrew it. If water escapes with any pressure, tighten it down again and double check that the shut off valve is full closed.
Remove the bleeder cap and let the excess water drain into the bucket. Depending on the pitch of the water pipe, trapped water will either drain through the exterior water faucet, or through the bleeder valve, or a little of both.
Once fully drained, replace the bleeder cap. Not only will you not loose it, but it will prevent water from rocketing out should you accidentally open the water valve.
If you have a built-in irrigation system, make sure you have an irrigation company come in to blow the water out.