I hate to say it, but frost is almost here, and freezing temperatures are next. Winter, so they say, is coming. Don’t worry, though. Spring is only five months away. Five…months…
Here’s the thing about weather. It doesn’t care. It doesn’t care that it’s raining on Halloween, or that it’s so warm the ski slopes have no snow, if you live in downtown Toronto, or rural Ontario. Nor does it care if you left your hoses out, full of water, all winter long. It just doesn’t care.
So for us gardeners, we have to stay one step ahead, and that can be especially true with some of our most weather-vulnerable systems, like our irrigation.
Whether you use the most sophisticated and expensive in-ground irrigation with the latest tech, or your basic hose and nozzle system, you will need to shut things down for the winter. Not doing so can lead to broken hoses, burst pipes, a lot of waste and potentially great expense.
Let’s spend a bit of time avoiding the avoidable, and learn what you need to do to shut your irrigation system down for the season.
The Lexicon Basics
Irrigation System: The mechanisms and devices used to distribute water to your garden.
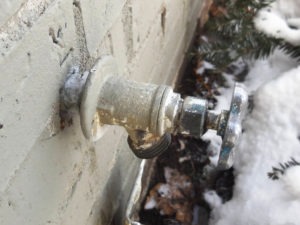
Faucet, Bib, Tap, or Spigot: The on/off mechanism found on the outside of your home that you open or close to allow or stop water from flowing into your irrigation system. Homes can have single or multiple faucets located at various places around the house, and are usually found just above ground level. Most taps use some variation of a wheel handle that needs to be turned a few times to fully open or close the tap.
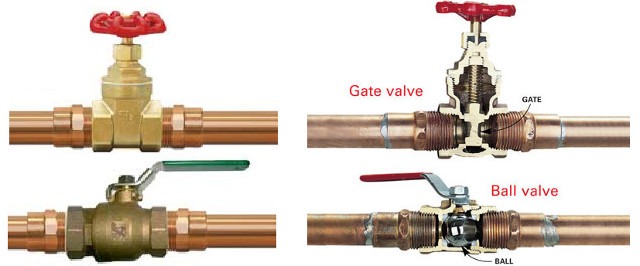
Shut-off valve: Generally an indoor, open/close device that allows or stops water from flowing through plumbing pipes. Similar to a tap/faucet, but refers more specifically to a device that is in the middle of a plumbing line as opposed the end of a plumbing line, like a tap. You will likely find one of two different types of shut-off valves – either a “gate” style with a round handle that must be turned repeatedly until it’s fully opened or closed; or a “ball” valve that has a narrow handle that opens and closes with a quarter-turn.
Purge: To get rid of something. In this case, you’ll be purging your irrigation system of water so it won’t freeze. Purging refers to the part of the plumbing system from the outside faucet to the end of your irrigation system in the garden.
Bleed: To empty, as in to bleed the pipes. This refers to the watering system from the outside faucet back into the house; the inside plumbing.
Bleeder Cap: A clever little device that, when removed, exposes a tiny hole that lets air into the plumbing system and releases trapped water between the shut-off valve and the outside faucet.
The 5 W’s
WHO needs to purge the irrigation system?
Anyone who has any sort of irrigation system and who lives in a climate where water freezes outside.
WHAT are we doing?
We are purging the irrigation system from the bib out, and bleeding, or emptying, the pipes from the exterior faucet back into the house.
WHEN do we need to do this?
Are you finished with watering your (hopefully organic) gardens? Is it shortly before temperatures will be consistently cold enough to freeze standing water? If yes and yes, then now is the time. And cold temperatures will supersede your desire to keep your garden going. Unless of course you are extending your growing season with hoop tunnels or cold frames. In that case there is minimal need for watering beyond a watering can once a week or so..
So that basically means within the next month or so, depending on where you live. Remember to consider your microclimate. For instance, if your faucet is located on the north side of the house, and never gets direct sunlight during the cooling season, then it’s likely things will freeze more efficiently there as compared to a system that’s in full sun even in December. Still, don’t let that full-sun exposure fool you. Trapped water will freeze regardless.
WHERE?
Your place. Your community garden. Your condo’s rooftop garden. Front yard, back yard, deck…wherever outside watering systems exist in cold climates.
WHY bother?
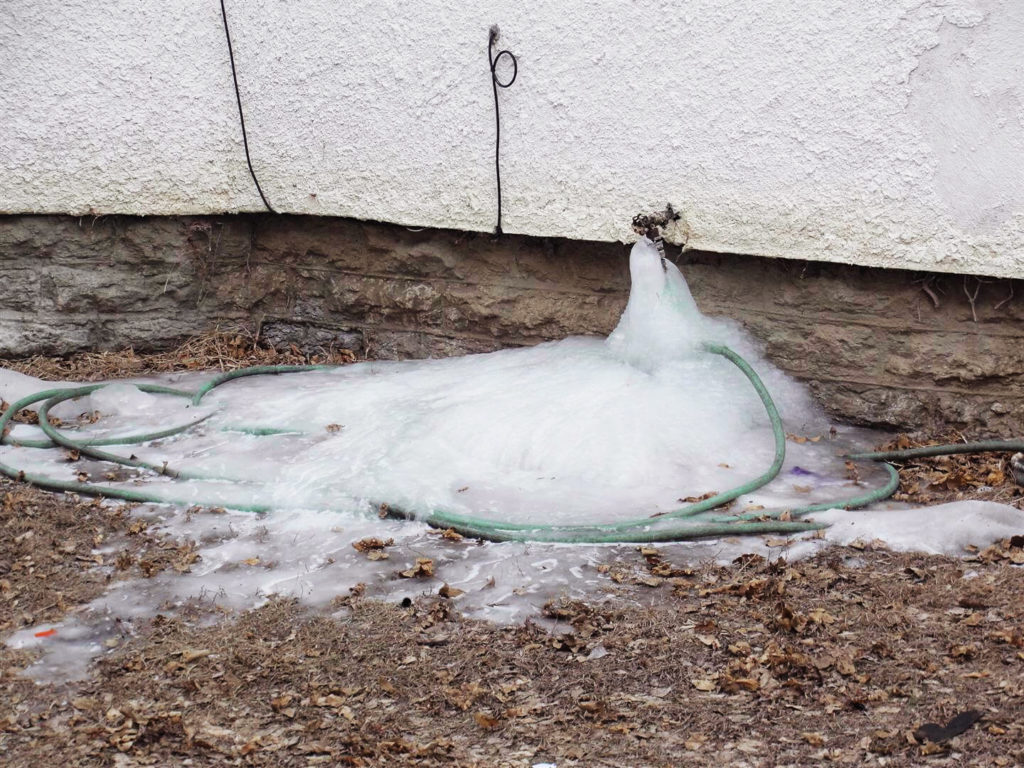
Water is the only liquid that expands when it freezes. If it’s trapped water, the expansion from freezing will put enormous pressure on the thing it’s trapped in, and can potentially create a lot of damage.
Here: A picture is worth a thousand words, so here, a few thousand words
 |
|
A frozen hose can cost anywhere from $50 to $200 to replace, depending on quality. A cracked bib can cost you a visit from a plumber, and, depending on how easily replaced the bib is, can lead to other expenses like fixing holes in drywall that the plumber needs to make in order to get to the cracked fixture. A flooded basement…well, you get the picture. And all of these minor to major repairs can be consequences of an un-purged irrigation system.
HOW do I purge the hoses?
Good question!
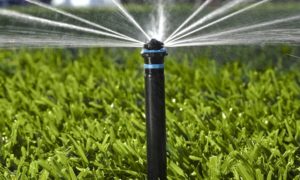
In-Ground Zone- and Timer-Controlled Systems
Those who are fortunate enough to have that high-end, in-ground, zone- and timer-controlled system are likely have an irrigation company that comes a few times a year to open up the system in spring, and shut it down before the deep freeze of winter. Usually, your irrigation company will call you to book the service, so you don’t even need to think about it. However, not all irrigation companies are created equally, so you may want to put it in your calendar to book your pre-winter service before it’s too late.
Surface Watering Systems

For do-it-yourselfers with vegetable gardens, surface watering systems are becoming increasingly popular. Not only are they inexpensive when compared to an in-ground system, but they are highly efficient and easy to maintain.
Generally speaking, they utilize a programmable timer that screws on to the outside faucet, with one or more zones that can be programmed to water different areas in different amounts at different times. Multiple zones are useful if you have one hose coming off the timer to water your grass once a week for two hours at 5am, and another hose watering your edible garden every other day for one hour, and even a third hose/zone that waters your sun-baked tomato bed every day for 30 minutes.
Connected to the timer will be one or more hoses (one per zone) that lead to a drip irrigation line that sits on the surface of the soil, or just under a layer of garden mulch. At regular increments along the line are drip emitters – small, volume controlled devices that allow an exact amount of water to drip out and directly onto the soil, with equal amounts of water coming out of each hole all the way down the length of the hose.
Purging these lines is easy.
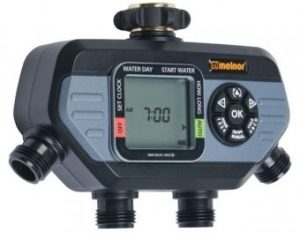
Source: Melnor
- 1. Turn off the faucet
- 2. Undo the hose(s) from the timer
- 3. Remove the timer from the faucet (you’ll discover very quickly if you forgot step 1)
- 4. Put the timer into “manual” mode for one minute to allow any trapped water to escape from the timer
- 5. The end of each drip irrigation line will culminate in some sort of stopper to keep the water within the system when it’s on. It is either folded over on itself, or has a physical plug. Unfold a folded end, or remove the stopper, as the case may be. This will let water flow out when you undertake the next step.
- 6.
- Option A: Attach an air pump to the hoses, one hose at a time. Create as tight a fit as possible, and turn on the air pump.
This will blow most of the standing water out of the line. We have used an inexpensive air pump made for blowing up air mattresses for this purpose to great effect. - Option B: For those with strong lungs and no heart condition (seriously), you can put your lips together and blow.
It takes some effort, and might leave you dizzy at times, so don’t rush or over exert. The longer the line, the harder this is. - Option C: The hand-over-hand method works too, passing the hoses and drip lines over your head, hand to hand, having gravity do the work. Pass the lines back and forth at least twice to make sure the bulk of the water is drained. You will have to remove the irrigation line from the garden surface, which is a pain if you plan on leaving it in place over the winter. These lines can stay outside so long as they’ve been purged, and often drip lines are held in place with garden staples. So this method can force you do undo that placement.
- Option A: Attach an air pump to the hoses, one hose at a time. Create as tight a fit as possible, and turn on the air pump.
Once this is done, move on to the section below on Bleeding the Pipes.
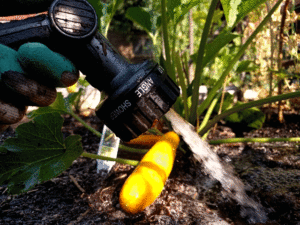
Hose and Nozzle
The most common irrigation system is the hand-watering gig – your basic hose and nozzle set-up. Not only is this the least expensive way to go, but it is often the preference of many a gardener. This is a great opportunity to observe and interact with your plants and to catch any issues that may be cropping up before they really take hold. We’ve discovered the beginnings of an infestation or disease early enough to avoid serious consequences simple because we were out in the garden hand watering, and inspecting things along the way. It’s also a way to customize the irrigation process, providing thirsty plants with more water and drought tolerant plants less.
To purge the hoses of a simple set-up:
- 1. Turn off the outside faucet
- 2. Remove nozzle or watering wand from the end of the hose;
- 3. Open up the nozzles to let any trapped water escape.
- 4. If you have multiple hoses connected one to another, you can separate them in this optional step.
It may make next steps easier. - 5. Empty the hoses of water using one of the three methods described above (air pump, blowing, or hand-over-hand).
- 6. Coil your hoses.
Bag your hoses, timer, and nozzles. Label the bags, especially if you have multiple areas that you water – front yard, backyard, vegetable garden… I like to bag elements in large paper yard waste bags – easy to label, can be used for spring clean-ups after you re-establish your irrigation, and are compostable. - 7. Store for the winter.
Now that everything is pretty empty of water, they can be kept outdoors, under the porch or in the garage. These elements can all handle cold weather, so long as they are water-free. You may want to keep the timer indoors, especially if it’s a digital model. Avoid storing your gear in places that will get wet from rain or snow.
Bleeding Your Pipes
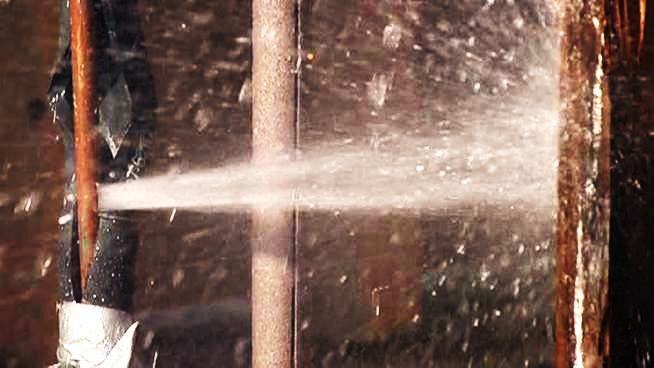
So that’s that for things in your yard, but you’re not quite done yet. Now it’s time to bleed the pipes – to empty any trapped water in the outside faucet and back into the house. Frozen and cracked pipes can actually be far more disastrous than a burst hose. In a deep freeze, pipes can freeze right into the wall of your house, and if they crack, they’ll leak at an alarming rate. Leaking can start when the thaw comes, or right away from the unfrozen water finding its way to the crack. It doesn’t take long for a room to flood, damaging floors, carpets, drywall, furniture… So do this:
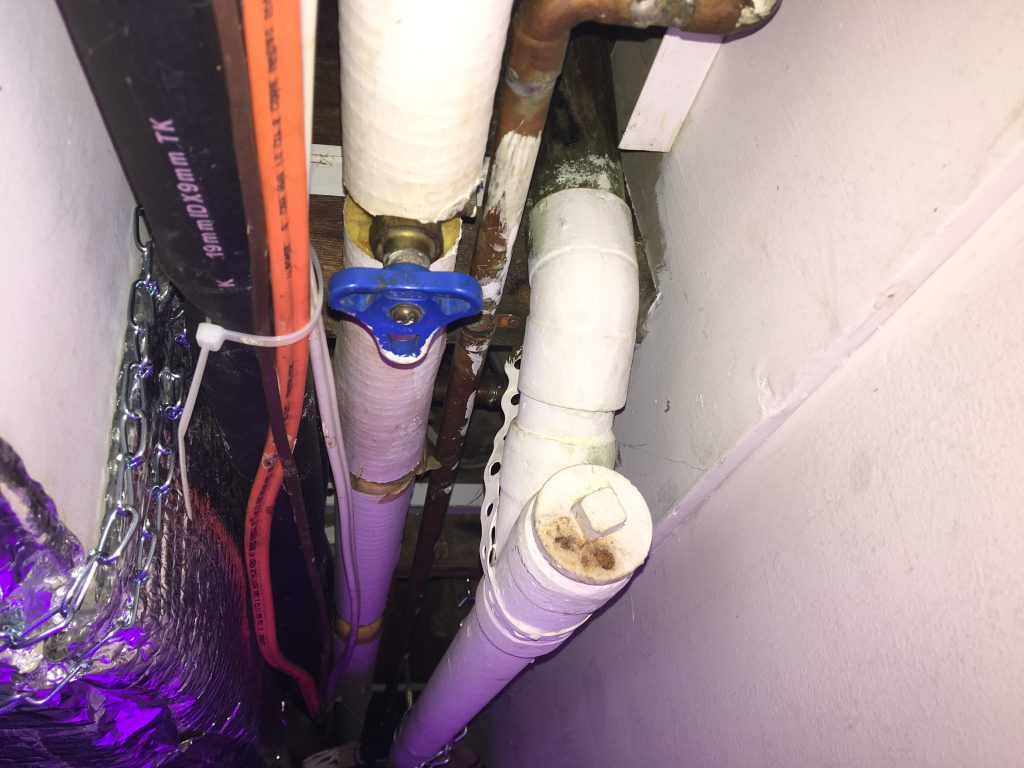
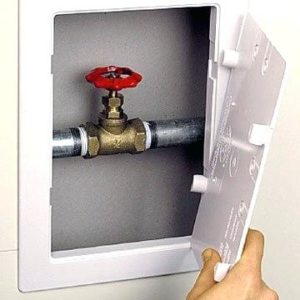
- 1. Find the shut-off valve in your house that controls the water flow to your outside faucet.If you’re not sure where it is, obvious places to look would be in the utility room where your furnace and water heater are, in the laundry room, or under bathroom or kitchen sinks. It can also be behind a purpose made covering or door. In an unfinished basement, it should be easy to find between the ceiling joists. You are looking for copper pipes that lead to your outside faucet, and specifically for a valve where you can turn off the water leading to your faucet. Make sure it’s fully closed.
|
|
 |
- 2. Go outside and fully open the faucet. Some water should run out. Good.
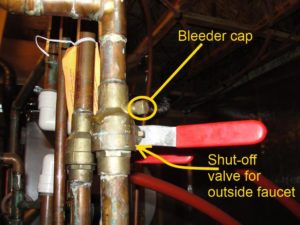
- 3. Return to the inside shut-off valve. Take a bucket and cloth with you.

Source: Structure Tech - 4. Locate the “bleeder cap”, a small, round cap likely made from brass. Place the bucket under the cap, and unscrew it. You’ll know pretty quickly if you have not turned the shut-off valve completely in step 1.
- 5. Use the bucket to capture any water that flows out of the copper pipe through the bleeder cap hole. If your plumbing was installed properly, sloping slightly to the outside, most of that water will drain to the outside as air enters the system. If it slopes to the inside, there may be a decent amount of water flowing into the bucket, depending on how long the copper pipe going to the faucet is.
- 6. Once the water stops flowing, replace the bleeder cap. Make sure you leave the outside tap open in case there is still water trapped inside. This way, when the water freezes, it will have room to expand.
I know it seems like a lot of work, but it really isn’t that difficult. Between purging over 200’ of hose and bleeding two different faucets at the BUFCO Lab and HQ, I spend maybe an hour and a half from beginning to end. That, or the time and expense of re-finishing a flooded basement. I’ll take the 90 minutes every time.
Stay tuned for the March or April BUFCO Bulletin and Blog Post, where you’ll learn how to open your system for the growing season, and how to make simple repairs to damaged hoses.